|
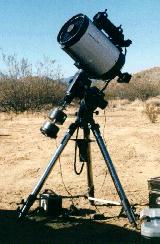
setup .......... films pictor tips Here's my Meade SSC-10 f6.3 scope (10 inch OTA on a LXD-650 mount) all set up and ready to for a night of astrophotography in the Anza Borrego desert. I bought my SSC-10 in 1993 right when they were first introduced. It's a shame the SSC line didn't last. I think the german equatorial with all of the LX200 computerized features is the way to go and it's very stable. |
|
I pretty much leave my Celestron f6.3 focal reducer/corrector attached
permantly - I like shooting at f4 (1000mm)! This really cuts down on
my exposure times and you really don't need to use hypered film. I can
usually reach the sky fog limit in about 20-25 minutes. With short exposure
times (16 to 20 min.) I can average about 3 photos a hour.
When manually guiding, I use the Celestron radial guider and the Celestron 12.5mm Ortho illuminated reticle. I used to have Lumicon easy-guider, but it's not as easy to use as the radial guider. I use a Spectra Sure-Sharp to do knife edge focusing - though lately I made a parfocal (to the camera) eyepiece and I can usually get the focus right on. I finally made a focus lock to lock down the mirror to solve the mirror shift problems during exposures - I just wish I did this years ago! I now use the Meade Pictor 201XT autoguider and gave up on manual guiding (though I still do it a little here and there). I use a B&L 80mm f10 maksutov guide scope with losmandy DR125 rings (super stable). On the pictor, I use an exposure time of 4 seconds and have been able to easily guide on 7 to 8th mag stars.
I use two 35mm SLR camera bodies: a Pentax ME Super and a Ricoh KR-5. The
Ricoh is a backup, but lately I like to shoot two rolls of film at once -
usually Kodak RG 1000 (for nebulas) and Fuji SG 800 plus (for galaxies and
clusters).
| |
|
films
..........
setup
pictor tips
| |
|
There are so many fast color films available today. Many are not suitable for long exposure prime focus astrophotography due to reciprocity failure. So far nothing has been able to top the legendary hypered Fuji SHG 400. Unfortunately it is discontinued and the replacement Super G 400 is not as good. However, I found the following current print films below to work very well unhypered:
I had some good/limited success with Kodak Royal Gold 400, Kodak Gold 400, and Fuji HG 400 V print films. Now don't get me wrong, these are good films, but they just don't record as much detail as the films above. And now for hypered films, besides the old Fuji SHG 400, I've tried hypered Fuji SG800 (not Plus). In my opinion, the hypering didn't really speed up the film much and it shifted the color balance towards the green (bad). I just bought a Lumicon Hypering kit 300, so more to follow on my hypering experiences... the first few batches (botched) are still promising. The pro films are little hard to find, you usually have to go to a real camera store to purchase them. If you don't mind mail order, I found B&H Photo 1-800-947-6628 to have excellent prices and service. With that in mind, I suggest you STOCK UP on any film you find that works well for you. You never know when they will change the formulation (for worse or better) or just discontinue it. Over the 6 years, lots of films have come and gone and I have a freezer full of old discontinued film.
When you get your film developed, ask them not to cut the negative. Too
many times when they cut them, they end up cutting right down the middle
of a photo! Also get to know your local photo finisher. I use Price Club 1
hour photo and I got them well trained. They know me and my routine:
never to cut my negatives and print at +2 darkness. Also they will reprint
any photos that are not satisfactory ie background not black enough at no
extra charge. I believe most photo finishers will do this, if not, find one
that does.
| |
|
pictor 201xt tips
..........
setup
films
| |
|
I bought the Meade Pictor 201 autoguider right when they were first introduced. It didn't work very well. It was pretty much agreed by all of the unhappy owners that it was not well tested and not all of the bugs were worked out. In early 1996, Meade re-introduced it as the Pictor 201XT. This time Meade did it right. It actually works as advertised and for the price $395, it's worth every penny. However it is not plug and play. You will have to spend a fair amount of time with it before you get it working properly (so you can sleep while it guides away). Read the user guide carefully - I cannot stress how important this is. Everything you need to know is in there. I could have avoided some headaches if I hadn't rushed through it and try using it that night. Anyways, here are some trouble spots that I encountered and might help save you some time:
| |
|
| |

[ hOmE | iNfO | pHoToS | oPtAs ]